ALCOHOL MARKER INSTRUCTOR AND SPECIALIST. As former Certification Instructor for both Copic and Spectrum Noir, I have a wide variety of knowledge to assist all types of alcohol Markers... Now also teaching watercolor stamping and assorted card classes.
Tuesday, November 26, 2013
Fun Stampers's Journey - Gifted Wings
Finally, I had time to sit down and work on this beautiful image that Richard Garay gave me eons ago. I just love this set. I decided to stamp it with very pale ink and give it a semi borderless look rather than stamped in black then colored. I also used a pale ink to stamp a coordinating stamp from the set onto the colored background paper for a perfect coordinated look.
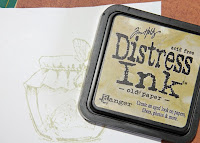
Step 1 - Stamp Image
Stamp image with a pale colored ink (Recommend Distress or Momento)
Step 2 - Background Paper
Stamp Background pale colored background paper with similar colored ink pad. here I used a pale brown.
Step 3 - Butterfly
Begin coloring the Butterfly with the darkest color closest to the center of the butterfly. Also be sure to add a dark line on the back layer of each wing. Copic R59 or Spectrum Noir DR7
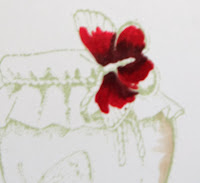
Gradually work your way towards the edge of each wing with lighter colors. Copic: R29, R24, R22 or R20 Spectrum Noir DR5, CR8 and possible a bit of CR3 if room allows.
Step 4 - Jar
Color Glass focusing the darkest colors on the outer side and bottom of glass jar. I used a variety of colors.
Copic: N2, E42, B000, YR30. & E30
Spectrum Noir: IG1, TN1, FS3
Step 5- Fabric Cover
I started by adding my darkest color in the deep valleys of the fabric folds working my way towards the hills with my lighter colors.
Copic: E37, E35, E33, E30, YR30
Spectrum Noir: TN6, TN4, TN3, TN2, TN1
I hope you enjoyed my tutorial. If you would like to purchase this stamp set you can find it from your local Fun Stampers Journey Coach.
Colorful Hugs,
Jennie
Monday, November 11, 2013
Watercolor Stamping - Classes coming soon!
Flower tutorial in future post... Here is how I colored the flower pot.
Step 1. Color Water based marker directly onto the rubber stamp. I used Marvy - Sepia #, stamp onto water color paper.
Step 2
Using a damp paint brush or watercolor brush pull color from the stamped lines.
Step 3
Add a bit of a second color if desired. I scribbled a bit of Marvy # onto an acrylic block and then scooped up some color using my water color brush.
Flowers are done in a similar fashion by stamping and then dampening the ink after it is stamped onto the watercolor paper. See close up below after the blue was added.
Here are a few more I painted the other night.
All Stamps are available from : Art Impressions Youtubes are also available on their website!
Markers: Marvy water based pens - LePlume II
Cardstock - basic.
Can't wait to see you in the classroom - on line or in person!
Colorful Hugs,
Jennie Black
Friday, November 8, 2013
Coloring Tutorial - House Mouse-Designs - Spectrum Noir & Copic
Image: Paws to Warm - Available by Stampendous House Mouse-Designs Collection!
Cardstock: Cord'inations
Printed Paper: Kaiser Kraft P958 Winter (love it!)
Sentiment - sorry Unknown from the stash
Punch - Martha Stewart
accessories: white ink for edging, lace, ribbon, button and jute.
Colored with Copic &/or Spectrum Noir - see tutorial for color selection.
I hope you enjoy this Color With Jennie Black coloring tutorial.
Thursday, November 7, 2013
Blog Candy - Complete Christmas Sentiments Stamp set! & Sugar Nellie Challenge 76
This image was colored with Copics, although you could easily do similar work using Spectrum Noir alcohol pens. I used some of my favorite color combinations that you will want if you take many of my classes as I tend to use these color combos frequently. My favorite pinks are R81, R83 and R85. The blues are B32, & B34 with a bit of B94. Browns E30, E33, E35, and a bit of E55. package is YG63 and YG03, R29 for the red bow and the yellow bow is Y32, Y35 and Y38.
Snow is done with a bit of glossy Accents and ultra fine white flower soft. It's super cool (pardon the pun... cool snow... lol).
Tomorrow's post is going to include the NEW SPECTRUM NOIR brush tips.... I am so excited. They arrived yesterday and I could barely wait to try them..... they are AMAZING!
Please check out the other images on the Sugar Nellie Challenge.
Today's coloring tip....
When coloring an image be sure to
1. look at layers. Every time you have layers, its best to had a shadow with the darkest color or a tad bit of gray on the back layer where it meets the upper layer. Lets look at this image again to determine where the layers are.
1. SLEEVE - the sleeve is on top of the coat. Therefore I added a bit of my darkest pink under her arm to pop the sleeve up and appear closer than her coat.
2. FUR - I added a bit of dark PINK shading on the coat where it meets the fur. This helps the fur appear closer than the actual coat.
3. BOOTS - the front boot is closer than the back boot, there fore where the two boots meet, I adde a bit darker color on the back boot to make it look like it had a bit of a shadow from the front boot.
Can you find more layers in this image?
My next post will feature the SPECTRUM NOIR NEW BRUSH TIP... WHEW HEW I AM SOOOO EXCITED!
Stay tuned - new online classes coming super soon!
Now for the Candy - List your most wanted thing you want me to teach on my on line classes below and I will pick one winner for this amazing gift on November 17th. Free postage only to USA residents. Out of country participants can still win, but they pay shipping from USA. WINNER WILL BE ANNOUNCED HERE AND ON FACEBOOK ON NOVEMBER 17TH. It's always an option to join as a follower, so you don't have to remember to look.
COLORFUL HUGS,
Jennie Black
Monday, November 4, 2013
House Mouse - Birthday
I know I know, another House Mouse-Designs - well I am in love with these little creatures lately! This image was colored with alcohol markers. (colors listed below). This will be a great image for future card classes as we always need birthday cards (even if I forget to send them).
Coloring Tips:
I used a center front light source. Therefore the light hit the center of each image first. I Placed my lightest color in the center of each shape and worked my way away from the light source.
Ice Cream: is a cone shape therefore the highlight follows the shape of the cone starting narrow at the top of the cone and widens as the shape widens.
Cone: This is a cylinder shape, therefore I placed the highlight along the center of the cylinder shape with my shading on the edges that are furthest from the light source. I also used a darker color for the indented part of the cone which makes the x's look raised.
The mouse wearing the green hat has a round body. I placed the highlight (lightest color) in the center of each circle and worked my way darker towards the edge of the entire circle. This will help build volume and make the image appear more like two spheres rather than two circles.
Image: House Mouse Designs - By Stampendous
Greeting: Birthday Wish by Stampendous SSC1115 (an amazing greeting set)
markers used: (first set of numbers are Spectrum Noir, second set are Copic)
Brown: TN3, TN6, TN2, GB3 or E30, E33, E35, E37
Gray: BG1, BG2, BG3 or W1, W3, W5
Pink: PP1, PP3, PP6 or R81, R83, R85
Cone: GB6, GB3, GB2, TN3, or YR21, E35, E32
skin: FS9, FS3, FS2 or E11, E93, E00, E53
Background airbrushed with B04 & Copic Air brush
Stickles for the flame on top of yellow ink. (the stickles is still wet in photo making it appear funny).
Hope you enjoyed these coloring tips.
Jennie
Thursday, October 31, 2013
Dropping in to say Hello!
Dropping in to say Hello! My dear friend Wendy Foster gave me this stamp while I was in England last month. Thanks Wendy, I love it! It's great for a baby shower, thinking of you card, birthday or celebrate!! I love versatile images!
The balloons are always fun to make transparent. When doing so, I find it best to practice layering colors before adding them to an image, and to layer colors that make pretty colors. Such as blue and yellow make green, and the red and blue make a purple. I would not mix a blue and orange or a green and red because those colors form a muddy color. Here is a link to a video I did on coloring transparent balloons. I hope you like it. I used Spectrum Noir colors in the video, however you can use any brand of alcohol markers.
The bear is built up of many different shapes. I used a straight forward light source with the light hitting his nose, tip of his feet and center of each arm before hitting the shaded areas. Remember to use the light colors where the light source hits first then work your way back with darker colors. Because his head is a sphere shape, the light would his his nose area before the sides of his face.
SPECTRUM NOIR COLORS: (generation 3)
Bear: GB3, GB6, TN4, TN6
Blue Balloon: IB1, IB2, IB3
Yellow: CT1, CT4, GB6
Coral Balloon: CR3, CR6, CR4, CR8
COPIC COLORS: Bear: YR21, E33, E35, E29, R22
Blue Balloon: B000, B00, B02, B04
Coral Balloon: R20, R22, R24
Yellow Balloon: Y32, Y35, Y38
Image: Lilly of the valley
Have an amazing day!
Tuesday, October 22, 2013
Classes in Southern California!
You guys have been begging and begging for me to teach local classes. Well, I am back. To be honest, I need to fill my classes to be able to continue teaching. So please come show me your support.
This month we will focus on House Mouse Designs by Stampendous. They are sweet little mice that are very curious. You can color them the traditional colors to go along with their individual personalities or color them as you wish. We will be making three card toppers and one completed card in each class, focusing on coloring skills and techniques rather than glueing cards together.
Bring any brand of alcohol markers, scissors, and adhesive for a full filled two hours. I am also teaching a alcohol marker 101 class in Santa Clarita - that is for sure a must take class for all beginners. I promise that by the time you leave class you will understand how to blend, correct and pick your colors!
See Calendar on side bar of my blog!
Colorful Hugs!
Monday, October 21, 2013
Challenge for Sugar Nellie
My life has taken a major turn in the industry and I am going back to teaching as self employed at local stores. I will be teaching Alcohol Marker classes. Most stores will allow you to bring whatever brand of alcohol markers you own. Some may only allow Copic or Spectrum Noir (depends on what they sell). So I look forward to seeing many of you in my upcoming classes at:
Scrapbooking Made Simple - Santa Clarita CA November 16th
10:00 - 12:30 - Alcohol Marker 101 Cost $25.00
1:30 - 3:30 - Alcohol Marker Coloring Class - Featuring House-Mouse Designs
Call store for registration.
Bring your own markers - list available on my facebook page and in store.
Pages from the Heart - Monrovia CA
Friday night November 8 6:30 - 8:30
House Mouse-Designs Full house expected - see you there!
Collective Journey - Redlands, CA - My home town! Tuesday November 12th
5:30 - 7:30 Alcohol Marker Coloring Class - Featuring House-Mouse Designs Cost
Call store for registration
Stamp Addict - San Diego, CA - 10 - 12 pm
Coloring class featuring House Mouse Designs.
Call store for details.
Today's Project: Sugar Nellie image that I purchased on line at (here). She is actually easier to color than she looks. I used my Copics which have been sitting on the shelf for almost two years... I am a bit rusty but with a bit of practice I am sure the coloring skill will come back. Be sure to pop over and see the rest of their images in their monthly challenge!
Hair: y32, YR21, E30, E33, E35, E13, E15, E37
Face: E000, E00, E04, E11, R20
Eyes: B00, B95 (too dark in my opinion would do b00 and b02 if I could do over)
dress: B91, B93, B95
Reds: R24, R29, R59.
Wednesday, July 10, 2013
Friendship Challenge
Hello everyone!
Have you played in the Spectrum Noir monthly challenge? It's fun and easy. This month the theme is Friendship. That means you could use a variety of stamps from fun, to floral or even use an image that reminds you the last time you met up with your friend (like that hot fudge sundae you had!).
Here is a sweet little girl from Sugar Nellie digitals! Is she darling or what? I think I can find a friend to send her to or I might be my own best friend and keep her! I actually don't want to part with her! LOL...
She was so fun to color - Here are the colors I used All Spectrum Noir of course!
skin TN2, FS9, FS4, FS2, FS1, Hair: GB1, TN4, TN6, Blues: IB3, IB1, cheeks CR2, Yellow: CT1, CT4
Please give the challenge a try and you may find out that you will win a prize!
Saturday, June 22, 2013
Patriotic Blog hop with Impression Obsession and Flower Soft
I had to participate in this hop. Fourth of July is my son's favorite holiday! All teen boys love girls in bikini's, so this works. Of course I colored it with my Spectrum Noir Alcohol Pens as listed at the bottom of this post. Good luck!
Impression Obsession/Flower Soft Patriotic Hop!
The hop will be from June 22nd through June 29th. Winners will be announced June 30th.
We’re having fun being Patriotic today with Impression Obsession stamps and Flower Soft. You’ll be inspired by creative projects as you hop along the Designer’s blogs.
PRIZES
One random comment author will be chosen by Impression Obsession to receive a $25.00 Impression Obsession Gift Certificate.
One random comment author will be chosen by Flower Soft to receive a $25.00 Flower Soft Gift Certificate.
Leave a comment on of the blog hop posts to be eligible to win. The more you comment the more chances you have to win!
WINNERS
Winners will be announced on June 30th at the Impression Obsession and Flower Soft Blogs.
Hop list:
Card Details:
Details
Stamps: Impression Obsession CL383 & D8026
INK: Memento Red & tuxedo black
Markers: Spectrum Noir Alcohol pens
blue: TB1, TB2, TB3, TB5
Red: CR8, DR5, DR3
Flesh: TN2 FS2 FS9
ocean: BT2
sky: tb1
Thursday, June 6, 2013
Spectrum Noir Design Team Call
Spectrum Noir is looking for several new, talented design team members from all around the world! If you love to color and/or work with alcohol ink, we want to see your art! In addition to cardmakers, we are looking for mixed media and other alternative artists for our team.
This design team call is open internationally; we are particularly looking for designers from the US, Central and South America, Canada, Australia, and Western, Central, and Eastern Europe. Don’t worry if you do not live in one of these regions but feel you would be a good fit for our team – submit your application for consideration!
As part of the Spectrum Noir design team, you will be provided with a generous welcome package, and will continue to receive the essentials you need to craft with, free of charge. You will be part of an elite group of alcohol ink colourists and educators; your work will be shared internationally on our web site and other online platforms.
What we expect from our team:
- Create at least one educational post for the Spectrum Noir web site each month. These tutorials must be high quality videos or contain step-by-step pictures and instructions.
- Participate in our monthly challenge.
- Be active on our Facebook page and willing to share your knowledge of alcohol inks and pens with others of all skill levels.
- Be an ambassador for the Spectrum Noir brand.
- Create samples for use at craft and/or trade shows as needed.
What you need to do:
- Send us direct links to three to five of your best projects using alcohol pens and/or refill inks. Use of Spectrum Noir is preferred but not required. Please be sure the medium you have used is listed. (note: do not send a general link to your blog or online gallery; be sure to send direct links to projects)
- Make sure what you are sharing with us represents your best work and really showcases what you love to do! We want our team members to take high quality photographs that show a good representation of alcohol ink. We will also be looking at your writing style and how you share information about the products you use.
- All work submitted must be original and created by you. (if colored image the image may be a stamp or tracing and not hand drawn)
Please submit these links via email to designteam@spectrumnoir.com for review. Include the following information in your email:
- Your full name
- Preferred email address
- Phone number
- Address (include country)
- Blog Link
- Links to any additional places we might see your work
- Any other design teams you are currently a member of
- Preferred crafting style – are you primarily a card maker? Scrapbooker? Mixed Media artist? Manga artist? Something else entirely?
- If you currently teach classes with alcohol inks, any relevant information about them.
- A little about yourself: What do you love about crafting? Why do you want to be a part of the Spectrum Noir team? (Please limit your response to around fifty words)
The deadline for submission is 1st July 2013. If chosen for the team, you will be contacted by a representative of Spectrum Noir no later than 10th July 2013. Additionally, we are always looking for guest designers; simply note in your email application that you would like to be considered for a guest position should you not be chosen for the full-time team. (Note: we will not be contacting potential guest designers at this time but instead will keep those applications on file and contact you when a guest position is available.)
If you have any questions prior to submitting your application, don’t hesitate to send us an email! We look forward to seeing your work!
Sunday, June 2, 2013
Summer is Here!
Spectrum Noir Summer Challenge:
Background was sponged on.
Car: BT2, BT4, BT5, BT8, TB5
Orange: OR2, GB5, CT4
Green: CG3, CG4, CT4
Grays: IG2, IG4, *G8
Headlights: LY3, and a bit of IG2
Techniques:
Standard blending. some of the image pieces are cut out and layered for a fun 3-D effect.
Be sure to join the Spectrum Noir Challenge for lots of fun and inspiration! You may even win a prize! A summer theme can include all sorts of images including summer flowers, pool time, picnics, swimming, boating, fishing, or whatever you like to do in the summer!
Colorful Hugs,
Jennie Black
Friday, May 17, 2013
Hello,
I am back from my 19 day work trip. It was super successful with doing Demos at Namta in Minneapolis, and teaching in Orlando, Manchester NH, and Novi MI. What a trip!
Today, I am joining the gals on the Flower Soft Team to announce their newest release. It's Fashion week. I picked this very patriotic image because I thought it was so cool. Girly and yet very patriotic at the same time. The Fourth of July is my son's favorite holiday. I can so see his fiancee Amanda wearing this for their annual celebration! She would look beautiful in it!
Mine is colored with my Spectrum Noir Alcohol Pens. Colors used are: DR7, DR5, DR3, CR8, CR5, TB5, TB3, TB2, TN2, TN3, TN6, FS2, FS3,, and a it of blender pen. However, this image is also available as a COLORED download! Can you imagine that! AMAZING.... Super quick and easy to get a WOW card.
Please take at peak at the Flower Soft Blog for more fun projects from this great new release! You can also follow them on their Facebook page.
Have a colorful Day!
Jennie Black
Thursday, April 18, 2013
Digital Delights - Barnaby Bee
Hello,
Is this the cutest little bee or
what? When I was asked if I wanted to
play along with the Digital Delights by Louby Loo gang for this special event, I went directly over to their blog to take a peek at their
images.. I immediately fell in love with this one and their sea turtle (and a
million others – check out the little girls!).
The Bee was rather easy to color and I love the way it turned out.
A few tips to remember
·
Look at
each area of the image and determine where the closest part of that piece is to
the light source (easiest is front center) .
·
The area
that is closest to the light gets the lightest colors. (as in the center of his
body and face are lighter than the outer portion of those areas).
·
The area
that receives less light because it is further away gets the darker colors.
·
Also
remember to add a shadow or darker color on bottom layers. (as in the inside of
the pea pod, under his hand, etc)
The clouds were fun and easy to
do.
1.
Color your
sky with a very light blue as in IB1 or BT2
2.
Now use
your blender pen to color clouds.
3.
Let dry
4.
Repeat if
cloud is not white enough.
I thought I was done then decided to pay a bit with the clouds to experiment. I added a bit of HB1 to the edge of the clouds and then re-diluted the edge with the IB1 and blender.... Can't decide which I like best so I posted them both!
Image is Barnaby Bee and is
available at: digital delights
Yellows: GB6, CT4, CT2
Pinks: PP6, PP5
Greens: CT4, DG3, CG2
Black/gray: IG9, IG7, IG5, IG2
Wing: Diamond stickles
Sky: IB1
Water: BT2, BT4
Purple: PL1, PL2
Clouds: Blender pen
I hope you enjoyed my tutorial
and come back for more!
Have a colorful day!
Jennie Black
Wednesday, March 20, 2013
Coloring with my Daughter in law 2b
A day cannot get any better than having my son and his fiancee' Amanda Szyplinski here for four days! I have had so much fun! Amanda and I colored all day on Tuesday - she is a newbie colorist and an amazing one at that! Her project is every bit as good as mine.. she may have to take over the business someday! LOL.. We had so much fun and we made such a mess! Austin even joined us and we spilt a bottle of blue ink all over my white desk.. No problem - I will think of them everytime I look at it! LOL.... See there is a positive in everything!
These are Amanda's Cards.... we did not write down the colors since we were just playing, but I wanted to share because she did such an amazing job! I am very proud of her work! She is amazing and I absolutely love her - My son picked the best to be my future daughter in law! whew hew.......
Saturday, March 2, 2013
Palette Blending - Spectrum Noir
Wow... I did a youtube yesterday and it has already had 440 views. So I thought I would share it with you guys. I hope you enjoy it. Here all I did was a bit of palette blending with my greens.
Have a colorful day!
Jennie
Thursday, February 14, 2013
She Sells Seashells.. with a bit of bling.
If you know me you know how much I love the ocean especially while scuba diving or snorkeling with the turtles. Most of the year that is not possible so I enjoy beachy things like seashells, and such. Here is a very simple image by Fun Stamper's Journey.
I used only one stamp and three Spectrum Noir Turquoise set. Of course I had to add a bit of bling to set it off. I did a quick little video to show you how I got the layered effect to my shells.
http://www.youtube.com/watch?v=QytzNu3u8w
Don't forget to join the Spectrum Noir Challenge this month! Its all about bling..... and if you don't have the right color of bling - no problem... just color it with your Spectrum Noir Pens.
Subscribe to:
Posts (Atom)