ALCOHOL MARKER INSTRUCTOR AND SPECIALIST. As former Certification Instructor for both Copic and Spectrum Noir, I have a wide variety of knowledge to assist all types of alcohol Markers... Now also teaching watercolor stamping and assorted card classes.
Tuesday, November 26, 2013
Fun Stampers's Journey - Gifted Wings
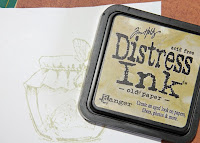
Finally, I had time to sit down and work on this beautiful image that Richard Garay gave me eons ago. I just love this set. I decided to stamp it with very pale ink and give it a semi borderless look rather than stamped in black then colored. I also used a pale ink to stamp a coordinating stamp from the set onto the colored background paper for a perfect coordinated look.
Step 1 - Stamp Image
Stamp image with a pale colored ink (Recommend Distress or Momento)
Step 2 - Background Paper
Stamp Background pale colored background paper with similar colored ink pad. here I used a pale brown.
Step 3 - Butterfly
Begin coloring the Butterfly with the darkest color closest to the center of the butterfly. Also be sure to add a dark line on the back layer of each wing. Copic R59 or Spectrum Noir DR7
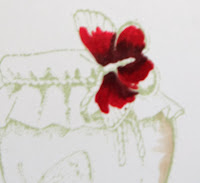
Gradually work your way towards the edge of each wing with lighter colors. Copic: R29, R24, R22 or R20 Spectrum Noir DR5, CR8 and possible a bit of CR3 if room allows.
Step 4 - Jar
Color Glass focusing the darkest colors on the outer side and bottom of glass jar. I used a variety of colors.
Copic: N2, E42, B000, YR30. & E30
Spectrum Noir: IG1, TN1, FS3
Step 5- Fabric Cover
I started by adding my darkest color in the deep valleys of the fabric folds working my way towards the hills with my lighter colors.
Copic: E37, E35, E33, E30, YR30
Spectrum Noir: TN6, TN4, TN3, TN2, TN1
I hope you enjoyed my tutorial. If you would like to purchase this stamp set you can find it from your local Fun Stampers Journey Coach.
Colorful Hugs,
Jennie
Monday, November 11, 2013
Watercolor Stamping - Classes coming soon!
Flower tutorial in future post... Here is how I colored the flower pot.
Step 1. Color Water based marker directly onto the rubber stamp. I used Marvy - Sepia #, stamp onto water color paper.
Step 2
Using a damp paint brush or watercolor brush pull color from the stamped lines.
Step 3
Add a bit of a second color if desired. I scribbled a bit of Marvy # onto an acrylic block and then scooped up some color using my water color brush.
Flowers are done in a similar fashion by stamping and then dampening the ink after it is stamped onto the watercolor paper. See close up below after the blue was added.
Here are a few more I painted the other night.
All Stamps are available from : Art Impressions Youtubes are also available on their website!
Markers: Marvy water based pens - LePlume II
Cardstock - basic.
Can't wait to see you in the classroom - on line or in person!
Colorful Hugs,
Jennie Black
Friday, November 8, 2013
Coloring Tutorial - House Mouse-Designs - Spectrum Noir & Copic
Image: Paws to Warm - Available by Stampendous House Mouse-Designs Collection!
Cardstock: Cord'inations
Printed Paper: Kaiser Kraft P958 Winter (love it!)
Sentiment - sorry Unknown from the stash
Punch - Martha Stewart
accessories: white ink for edging, lace, ribbon, button and jute.
Colored with Copic &/or Spectrum Noir - see tutorial for color selection.
I hope you enjoy this Color With Jennie Black coloring tutorial.
Thursday, November 7, 2013
Blog Candy - Complete Christmas Sentiments Stamp set! & Sugar Nellie Challenge 76
This image was colored with Copics, although you could easily do similar work using Spectrum Noir alcohol pens. I used some of my favorite color combinations that you will want if you take many of my classes as I tend to use these color combos frequently. My favorite pinks are R81, R83 and R85. The blues are B32, & B34 with a bit of B94. Browns E30, E33, E35, and a bit of E55. package is YG63 and YG03, R29 for the red bow and the yellow bow is Y32, Y35 and Y38.
Snow is done with a bit of glossy Accents and ultra fine white flower soft. It's super cool (pardon the pun... cool snow... lol).
Tomorrow's post is going to include the NEW SPECTRUM NOIR brush tips.... I am so excited. They arrived yesterday and I could barely wait to try them..... they are AMAZING!
Please check out the other images on the Sugar Nellie Challenge.
Today's coloring tip....
When coloring an image be sure to
1. look at layers. Every time you have layers, its best to had a shadow with the darkest color or a tad bit of gray on the back layer where it meets the upper layer. Lets look at this image again to determine where the layers are.
1. SLEEVE - the sleeve is on top of the coat. Therefore I added a bit of my darkest pink under her arm to pop the sleeve up and appear closer than her coat.
2. FUR - I added a bit of dark PINK shading on the coat where it meets the fur. This helps the fur appear closer than the actual coat.
3. BOOTS - the front boot is closer than the back boot, there fore where the two boots meet, I adde a bit darker color on the back boot to make it look like it had a bit of a shadow from the front boot.
Can you find more layers in this image?
My next post will feature the SPECTRUM NOIR NEW BRUSH TIP... WHEW HEW I AM SOOOO EXCITED!
Stay tuned - new online classes coming super soon!
Now for the Candy - List your most wanted thing you want me to teach on my on line classes below and I will pick one winner for this amazing gift on November 17th. Free postage only to USA residents. Out of country participants can still win, but they pay shipping from USA. WINNER WILL BE ANNOUNCED HERE AND ON FACEBOOK ON NOVEMBER 17TH. It's always an option to join as a follower, so you don't have to remember to look.
COLORFUL HUGS,
Jennie Black
Monday, November 4, 2013
House Mouse - Birthday
I know I know, another House Mouse-Designs - well I am in love with these little creatures lately! This image was colored with alcohol markers. (colors listed below). This will be a great image for future card classes as we always need birthday cards (even if I forget to send them).
Coloring Tips:
I used a center front light source. Therefore the light hit the center of each image first. I Placed my lightest color in the center of each shape and worked my way away from the light source.
Ice Cream: is a cone shape therefore the highlight follows the shape of the cone starting narrow at the top of the cone and widens as the shape widens.
Cone: This is a cylinder shape, therefore I placed the highlight along the center of the cylinder shape with my shading on the edges that are furthest from the light source. I also used a darker color for the indented part of the cone which makes the x's look raised.
The mouse wearing the green hat has a round body. I placed the highlight (lightest color) in the center of each circle and worked my way darker towards the edge of the entire circle. This will help build volume and make the image appear more like two spheres rather than two circles.
Image: House Mouse Designs - By Stampendous
Greeting: Birthday Wish by Stampendous SSC1115 (an amazing greeting set)
markers used: (first set of numbers are Spectrum Noir, second set are Copic)
Brown: TN3, TN6, TN2, GB3 or E30, E33, E35, E37
Gray: BG1, BG2, BG3 or W1, W3, W5
Pink: PP1, PP3, PP6 or R81, R83, R85
Cone: GB6, GB3, GB2, TN3, or YR21, E35, E32
skin: FS9, FS3, FS2 or E11, E93, E00, E53
Background airbrushed with B04 & Copic Air brush
Stickles for the flame on top of yellow ink. (the stickles is still wet in photo making it appear funny).
Hope you enjoyed these coloring tips.
Jennie
Subscribe to:
Posts (Atom)