Wednesday, October 26, 2011

Stampavie.... Holly Hobbie Style image!


I loved Holly Hobbie and had to have a Holly Hobbie shirt, lunch pail, doll and everything Holly Hobbie.

When I first saw the Sarah Kay images by Stampavie I fell in LOVE..... because the images reminded me so much of Holly Hobbie. I have been addicted ever since. Here is what I think will be my personal Christmas card that I plan on sending out this year to a few family and friends who will get a hand made cards... (last year No One got one.... I was moving!). If you want a chance to color her, please come to my classes... I will be including this in my Stampavie Christmas Card Classes at Scrapbooking Made Simple in Santa Clarita, Scrapbooking Heaven in Westminster, Collective Journey in Redlands, and Pages From the Heart in Monrovia.... The other projects are just as cute! (class images and colors are posted in my facebook gallery) Facebook name: Jennie Lin Eger Black

Sorry the picture is dark.... My camera card is acting up for some strange reason.. guess I have worn it out!

Colors used in this darling image are as follows:
Sky: B91, B93,
Dress/Hat: R22, R24, R27, R59
Purse/Hair/Bow: Y32, Y35, E33,
Post: E30, E33, E35,
Mailbox/Shoes: C1, C3, C5 optional C7
Green Holly: any greens (G20, G82, G85 my favs)
Red berries: Red Spica Pen.

Looking forward to sending these out! I am soooo excited! Love love the buttons, and heart punch... I need to think of a small greeting to put in the oval piece... maybe sending Holiday Hugs? That would go with the heart! Hmmmm

Sunday, October 23, 2011

Our Craft Lounge - Guest Designer - Granny's Potion

WICKED AWESOME!
Ya gotta Love Granny from Our Craft Lounge. She is always coming up with some sort of costume or outfit. Here she is as a witch in the "Granny's Potion" clear stamp set. I wanted to to use this frightingly wonderful MOXXIE paper, so I used very muted colors for Granny's dress... normally my hands reach for the brighter colors, but I wanted her to match the paper. All of the fun background paper is from Moxxie's new halloween line... I LOVE it!

Today is my last day as guest designer for OCL. Boo Hoo.... I love these folks, so you can bet I will be posting more projects using their amazing images as well as teaching classes featuring the awesome OCL stamp line and SPARKLY FLUFF....

Happy Halloween Everyone!

Stamps Used: Granny
Copic Colors used:
Greens: G93, G95, G99 (added a bit of c5 in shaded areas)
Oranges: yr16, yr18 (again added C5 to shaded areas)
Hair: C1, c3, C5
cauldron: V91, V93, V99
ground: E43, E44
yellow: y11, y00
skin: e00, e11
broom: stick E43, E44, other y21, E33, E37

Decorator Paper: Moxxie
Dies: Spellbinders

Stamps Available at your local stamp or scrapbook stores
online store also available here:


Saturday, October 22, 2011

Vintage - Stampendous

Ok.. not my usual style.. but believe it or not I prefer the vintage look to the clean crisp look... One would never know it. Vintage is harder for me to do, don't know why, but it does not come natural for me. Clean and simple layouts just pop into my head..... I love it when I take the time to create something more grungy! Even got my pinkies inky! LOL.... didn't have a greeting that would fit in the tag and I had to use the tag....love it! DO YOU? SHOULD I DO MORE IN THIS STYLE?


Stamp: Stampendous
Copics:
Greens; G20, G82, G85,
Reds: R22, R24, R27 and a tiny bit of R59
skin: E00, E11, R21 and a tiny bit of B21 for eyes
Background: E43, E44 (my new favorite browns)
flowers are from Tim Holtz Sizzix Die.
rhinestone crystals.... love them!

Impression Obsession - PURPLE challenge

It's time for Impression Obsession's Purple Challenge! Whew hew... Purple is one of my very favorite colors, so I could not pass this challenge up. Here is a cute little girl from one of their fall stamps (Girl with umbrella #F1101)... I think she is soooooo CUTE. I have colored her is a number of colors, including browns, golds, greens and now.... PURPLE.... I used Copic V20 and V25 for the main purple part of the image! Airbrushed the edges with a bit of E43, & E44.... love it! She was so fun to color!


Be Sure to check out the I.O. challenge for more fun PURPLE projects.. click HERE..

Image: Impression Obsession
Stamp: Girl with Umbrella #F1102 Available HERE
Greeting: #a5584 available HERE
Copic Colors used:
Boots/clothes: V20, V25,
Hair: YR21, E33, E35, E37
Skin: E000, E11, E04, E00
Leaves: YR21, V25
Background: Airbrushed with E43 & E44
Ground: hand colored with E43, E40, E44
Cardstock: Canvas Corp , and FabScraps (purple - High Tea)
Other Tools/Embellies: black pearls, ribbon, Spellbinder's dies and circle punches

Please join my blog as a follower! New samples weekly! Hugs Everyone!

Tuesday, October 18, 2011

OCL - Guest Designer for October - Outta This World

Is this card darling or what? I love it. I have not made many little boy cards since Austin was younger but this is so fun.... wonder what Austin would think If I sent it to him for his 18th birthday that is actually later this month. I don't think he will care what card I send as long as I send a check with lots of $$$$ in it... LOL... gotta love teens.... mine is the best - just ask me, (all moms have the best kids).

This set is called Outta this world by Our Craft Lounge. Please check out their blog as I am their guest designer for the month of October.... I promise to have something NEW and fun next monday but check it out now to see what else they have. All of their stamps are available at your local Scrap/Stamp Store...... if they don't have them please ask.

http://www.blog2.ourcraftlounge.com/


Monday, October 17, 2011

Trick or Treat - OCL.

Wowza I spent the entire weekend at Scrapbooking Made Simple. It is an amazing store with tons of energy and good stuff. Kimberly from Our Craft Lounge was there for a darling make and take for 54 guests! Whew Hew. I taught four classes. It's always fun with Kimberly and OCL......

This is a stamp from the new single stamp sets.... Is this kitty darling or what! So simple to
color.

Many people ask how to color images "black" I don't color anything black - don't even have a black Copic Sketch marker in my personal set. I use various grays to give the feel of black. In this image I used N1, N3, N5 and N7 to give the feel of black and feature a Highlight (N1), midtone (N3), and the shading (N5 & N7). Hat is colored with V01, V12, and V15.... Oranges are Y15, YR16 and YR18.

Thursday, October 13, 2011

Copic - Stampavie - Sweet Dreams


Okay, now is this the sweetest little image or what! I just love her. I have owned this stamp for almost two years and have never ever had a chance to take her out of the package! Finally, and it was worth the wait. In this image you can see that I used the light from the candle as my light source. I highlighted the front of her hat and nightie as well as her face. Note the sky is also darker behind her than it is in front.

Just love her! The paper is by Kaiser Paper, Greeting is from OCL and ribbon is BoBunny! What a combo! It all goes so well.
Colored with Copics:
Greens: G20, G82, G85 (with a bit of Y11 for highlights)
Reds: R22, R24, R27, R59
Gold: Gold Spica for candle base
Yellow: Y11, Y15
Hair: YR21, YR24, E33, E37
skin: E000, E00, E11, E04

November 2011 class project

Wednesday, October 12, 2011

Penny Black Images -

Here are three Cards that I finally finished this morning. Love them...... theme is clean and simple layouts.

I am not a lover of the color Green, but here I tried to use the traditional Christmas red and green (I know there is more red than green.... LOL). Two of the cards are a simple easel card... they are fun to make. Take a peek at the side view below and you will see how it stands up. Come to class next month and we will be sure to do at least one easel card!
Images: Manger Scene is Stampendous
Girl & Bear are both by Penny Black.

Reds: R22, R24, R27, R59,
Greens: G20, G82, G85
Browns: E30, E33, E35, (ground is E40 & E44)
Yellow: Y11, Y15, Y18
Hair: Y, E33
Our Craft Lounge Sparkle Fluff - Sugar


Copic Weekend at SCRAPBOOKING MADE SIMPLE - Santa Clarita, CA


Whew Hew... Join us at Scrapbooking Made Simple in Santa Clarita this weekend for a variety of Copic Classes I will be teaching......

SATURDAY
Copic Techniques 101
Copic - Shading & Highlights - Featuring Bubbles image from Our Craft Lounge.
Plus guest Stamp designer Kimberly McCausland from Our Craft Lounge will be helping you with a darling FREE make and take. Kimberly is a lot of fun and is bringing along a whole Our Craft Lounge Trunk Show.... It is a day you will not want to miss.

SUNDAY
Copic Coloring Class - Images by The Peddler's Pack
Copic - Images by Our Craft Lounge Card Class

for my students:
Copic Colors I used for my cards are listed below. Remember that I will assist you in helping you increase your Copic Marker selection prior to class. You are also welcome to use different color combinations than the ones that I used.

The Peddler's Pack Images (many colors are used in all three images)
SANTA: R22, R24, R27, R59, E00, E11, G20, G82, G85, E40, E43, E44, E30, E33, E37
ORNAM
ENTS: Y32, Y35, Y38, R22, R24, R27, R59, G20, G82, 85, Y11, B21, B24, B2, C1, C3
HOLLY: G20, G82, G85, R22, R24, R27, R27. R59


Our Craft Lounge Images (Many colors are used in all images)
Surfin Santa B00, B000, R22, R24, R27, R59, E00, E11, E000, Y11, Y32, Y35, glitter Sugar Sparkle Fluff
Bubbles same colors add: YR21, YR24, E40, E42, E44, bring all your greens.... or G20, G82, G85,
Mrs. Frosty: Rv00, Rv02, RV55, Y11, Y15, any orange, E33, E37, w1*, w3* (or C1, C3)Lemon Sparkle Fluff
Frosty: R22, R24, R27, R59, C1, C3, C5, C7, E37, E33 - Black Liquid Pearl


Sunday, October 9, 2011

Guest Designer - Our Craft Lounge - Bubbles!

I love love love all of Our Craft Lounge Stamps and embellishments. I have been a complete fan from the very beginning. Isn't this image DARLING! This is my all time very very favorite OCL character... Bubbles!

One of the things I love most about several of the OCL stamp sets, is that you can combine several sets together to make a large variety of scenes. In this scene, I used two different sets to create the complete scene. I used the hill and sea grass images from the set "Oceans of Fun" and the Turtle, tree and fish are from "Sea-son's Greetings"... I could have also used Bubbles ( stamped below in Blue). They all coordinate beautifully!.....

To create this ocean scene I followed these easy
steps.
1. First Stamp Turtle (closest image to the front)
2. Stamp Turtle on to scrap paper, masking paper, or sticky note, cut out and mask turtle.
3. Stamp the rest of your images (masking as necessary).
4. Color image.

Don't forget to add SUGAR SPARKLE FLUFF to Bubbles' Santa Hat! It is the best stuff ever for any type of fur or dimension. I also added Liquid Crystal to the turtle's back and the fish for added dimension! I colored Bubbles in Blue about two years ago (below).... This card has been traveling around from store to store and is a bit beat up, but I still smile when I look at it!
view stamps HERE or pick them up at your local Stamp/Scrapbook Store!
COPICS USED:
GREENS: YG03, YG63, YG67, YG01, Y11
YELLOW: YR21, YR24
REDS: R22, R24, R27, R89
SAND: E40, E42, E44
OCEAN: B000
EYE: B21


LOL.... now for a laugh! Harley.... this picture is for you! Not all pit bulls are vicious are you! This is a picture of my dear friend Krista's Pitt Bull saying goodbye to Bugsie after spending a weekend together in Phoenix.... Bugsie sends hugs Harley! I didn't catch Bugsie licking Harley on the nose.....RATS.

Thursday, October 6, 2011

Impression Obsession -It's a Costume Party!


My costume will be a 'WITCH" Whew hew.... check out the buckle on my new boots.... Toot Toot.. My first pair of boots as an adult... I know I know I am over 50 years old and finally got a pair of boots (Wolky!) to fit my foot! I am soooo excited- my foot has such a high arch that I have never been able to get my foot into a boot! LOL.. My son said they look like something that should be sticking out from under the witches house in Wizard of Oz.... ARGH.... so I thought it fitting to add them in this "costume Party Photo"


Colored with Copics:
Project: Treat Bag (made with Sizzix die cut!)
Image: Witch on a Broom by Impression Obsession (illustrator is Sarah Phelps)
Paper is by Moxxie and Canvas Corp

Check out the rest of the challenge at the Impression Obsession Blog!


Sunday, October 2, 2011

Our Craft Lounge - Guest Designer

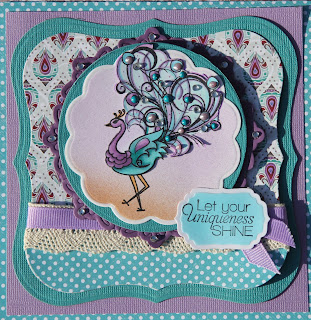
Wowza.... One of my very very favorite Stamp Companies asked me to be a Guest Designer for the Month of October... Whew He... time to strut my stuff... so I thought I would start off the month with a Peacock!

The moment I saw this peacock from the PROUD AS A PEACOCK stamp set (Pictured below).. ..... I thought purple and turquoise... I just had to have it. I could not find a background paper anywhere that seemed to fit the style and colors I wanted... So I colored part of this background paper with a V15 Copic Marker to make it match! Whew Hew problem solved. Give this a try....
I only colored a tiny piece of these "ornanments" with my purple marker
and it gave enough purple in the paper to perfectly match the colors I used to color my image. I just love my Copics.

I LOVE Our Craft Lounge... Did you know that my very first image
that I colored with Copic Markers was Bubbles by Our Craft Lounge? Yep, Our Craft Lounge was a HUGE part of my becoming a successful Copic Teacher for local, national, and international stores as well as a Certification instructor for Copic. THANK YOU SO MUCH OCL... I LOVE YOU!

Products used: Available at your local Scrapbook and Rubber Stamp Stores
STAMPS Our Craft Lounge - Proud as a Peacock
deco paper: Harmonie - Noel - Ornaments
deco paper: My Mind's Eye - Hip Hooray girl - Happy Day
Copic: (distributed by Imagination International): Copic Pens, X-press blending card and adhesive, ABS 1 airbrush kit.
Pearl Pen by Viva Decor (turquoise and Lilac)
Spellbinders dies - various

Markers used:
Bg10, BG53, BG72, BG75
V01, V12, V15
YG21,

PLEASE SUPPORT YOUR LOCAL RUBBER STAMP AND SCRAPBOOK STORES

Click here to visit the Our Craft Lounge blog, it's an amazing place to find great ideas to spark your imagination! Have a wonderfully colorful day!

HUGS
Jennie

Saturday, October 1, 2011

Christmas is Coming! - Saturated Colors Challenge - Copic Creations.

COPIC CREATIONS - Saturated Colors Challenge: Check it out HERE

Here is an image I colored on the airplane the other day. It's a very fun image to color. I have colored it in many different color combinations, which gives me a totally different outcome every time I color it. This time I elected to color the background blue for the sky, the previous time I colored it I wanted to use dark green for the inside of the tree. The colorist can really change the outcome of the image by changing the back ground colors.... (night/day etc). This image is extremely easy to color. The dark dots or hash marks are where you color the image with the darkest color ink.. and where the hash marks are thinner or absent, you would use your lightest color... Easy Peasy! Note that even on the beads I used three colors leaving a highlight in a circular fashion to show a highlight on each individual bead. The pine needles are colored with a random selection of greens and colored in a random fashion (darkest closest to the center of the branch.)

Stamp: The Peddler's Pack, Beaverton Oregon
Copic Markers used:
Sky: B000, B91, B93
Pine Needles YG21, YG24, YG03, YG67, G85, Y11
Blue ornament: B21, B24, B26, B29 (my blue ran out of ink so I used pallet blending using B21 and B26)
Red Beads and Ornament: R22, R24, R27, R89
Yellow Ornament: Y32, Y35, Y38

Below is the image colored by me last year... see the difference? We all improve with time and practice....although I still really like the below coloring, the above image has smoother blends and the leaves have more definition and color. Thought I would share an older coloring of mine with a current one to show the difference! I don't remember what colors I used last year, but I am sure they were very similar to the colors I used this year.... Colorful Hugs to everyone! Get going on your Christmas cards... This is one of my images that we will be coloring in some of my coloring classes in October and November.. watch my schedule!